How Is Toast Bread Made?
From dough to sliced bread through fermentation, baking, cooling, slicing, and toasting.
The Overview
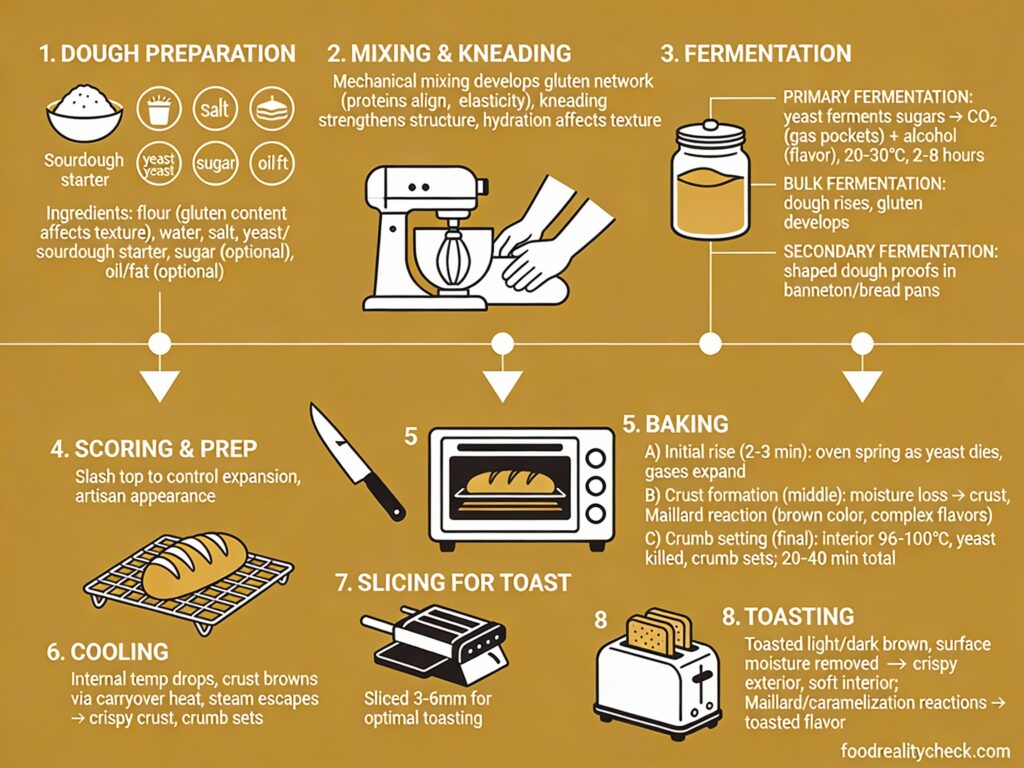
Toast bread (also called sandwich bread or pullman loaf) is produced by mixing flour, water, yeast, and additives into dough, fermenting it to develop structure, baking it in enclosed pans to create uniform slices, cooling it to room temperature, slicing it into consistent pieces, and optionally toasting it to create the signature crispy exterior and soft interior.
The manufacturing process is optimized for consistency and shelf-life—uniform loaf shape, uniform slice thickness, and controlled moisture to ensure the bread toasts evenly and lasts 5-7 days without molding.
Here’s exactly how flour and water transform into uniform sliced toast bread through fermentation, baking, and industrial precision.
🥘 Main Ingredients
• All-purpose or bread flour
• Water
• Yeast (commercial baker’s yeast)
• Salt
• Sugar
• Dough conditioners (optional)
• Preservatives (calcium propionate, optional)
Step 1: Ingredient Measurement & Pre-Mixing
All ingredients are weighed on digital scales to exact specifications—flour by weight (not volume, which varies), water, yeast, salt, and optional sugar or dough improvers.
Water temperature is controlled (typically 20-25°C) to ensure the final dough reaches optimal temperature (26-28°C) for fermentation.
Flour quality is verified—protein content (typically 11-13% for bread flour) is critical for gluten development and loaf structure.
Step 2: Dough Mixing (Using Spiral or Planetary Mixers)
Measured flour, water, and yeast are loaded into large industrial mixers (100-300 liter capacity) and mixed at low speed for 2-3 minutes to fully hydrate all flour particles.
Salt is added after initial hydration (adding salt too early inhibits yeast activity), and the dough is mixed at medium speed for 6-12 minutes to develop gluten network.
Gluten development is critical—proper mixing creates a viscoelastic dough that traps yeast-produced CO₂ bubbles, allowing bread to rise uniformly.
Step 3: First Fermentation (Bulk Fermentation)
Mixed dough is transferred to large fermentation tanks (500+ liter capacity) where it rests at controlled temperature (26-28°C) for 60-90 minutes.
During this time, yeast consumes sugars and produces CO₂ gas, causing the dough to expand. Beneficial bacteria also develop flavor compounds through enzymatic reactions.
The dough should nearly double in volume by the end of this phase—indicating proper yeast activity and fermentation.
Step 4: Dough Folding & De-Gassing
After bulk fermentation, the dough is folded or degassed to release excess CO₂ and redistribute yeast and nutrients evenly throughout the mass.
This step prevents oversized gas pockets (which would create uneven, gummy slices) and ensures uniform fermentation in the final loaves.
Folding is done gently to avoid crushing yeast cells—modern industrial systems use slow-speed mixers or folding machines.
Step 5: Portioning & Shaping
De-gassed dough is divided into equal portions (typically 600-900 grams for standard loaves) using automatic portioning machines that weigh and cut dough to precise weights.
Portioned dough pieces are gently formed (either by hand, by shaping machines, or by gentle rolling) to create rectangular loaves that will fit into standard baking pans.
Proper shaping is critical for uniform loaves—poorly shaped dough produces irregular, asymmetrical loaves that slice unevenly.
Step 6: Final Fermentation (Proof)
Shaped dough pieces are placed into oiled or non-stick baking pans (typically metal rectangular pans that create the characteristic uniform loaf shape) and transferred to proof boxes at 34-38°C with 75-85% humidity.
Final fermentation lasts 45-90 minutes—the dough rises inside the pan, pressing against the sides and top, creating uniform shape.
Optimal proofing is critical—underproofed dough bakes dense and gummy; overproofed dough tears and becomes overly airy.
💡 Did You Know? Toast bread is baked in enclosed rectangular metal pans (called Pullman pans when lids are used) that constrain the dough’s rise and create perfectly uniform, rectangular loaves with minimal crust. This contrasts with artisanal bread baked on open pans, which rises freely and develops thick crusts. The confined baking environment creates the distinctive tender crust and soft interior of commercial toast bread.
Baking: Creating the Crumb Structure
Step 7: Oven Preparation & Temperature Control
Deck ovens or convection ovens are preheated to 200-220°C (390-430°F) depending on loaf size and desired crust color.
Modern commercial bakeries use programmable ovens with multiple zones at different temperatures—higher heat for initial spring and browning, lower heat for finishing without burning.
Humidity is carefully controlled throughout baking—initial high humidity (from steam injection) keeps the crust soft during early rising, then humidity decreases toward the end to allow crust drying and browning.
Step 8: Baking (Oven Spring & Crumb Setting)
Proofed loaves in pans are loaded into the oven on conveyors or deck ovens and bake for 25-40 minutes depending on size and oven type.
During initial minutes, yeast activity increases with heat, producing a final burst of CO₂ (called “oven spring”) that causes loaves to expand dramatically—typically 10-20% volume increase during the first 5 minutes.
As temperature rises above 60°C, yeast dies and gluten denatures, setting the crumb structure. At 65-70°C internal temperature, starch gelatinizes, creating the bread’s characteristic soft, spongy interior.
Step 9: Crust Development & Browning
As water evaporates from the crust surface, the Maillard reaction (browning of proteins and sugars) creates color and flavor at the crust surface.
Final internal temperature should reach 96-98°C (204-208°F) for fully cooked bread—any lower and the crumb remains gummy, any higher and bread becomes dry.
Baking is complete when loaves have reached target internal temperature and crust is uniformly golden brown (but not dark for toast bread, which should have pale, soft crust).
Step 10: Cooling Phase (Critical for Quality)
Hot loaves are removed from pans immediately after baking and placed on cooling conveyors at room temperature (20-22°C) for 60-120 minutes.
Cooling must be thorough and slow—the crumb is extremely delicate when hot and compresses easily if cooled too quickly or in a confined space.
Proper cooling allows internal moisture to redistribute evenly, creating uniform, stable crumb texture. Improper cooling produces gummy centers or excessive drying.
Step 11: Automatic Slicing
Cooled loaves move to high-speed automatic bread slicers equipped with sharp blades moving at 50+ Hz (50+ cuts per second), creating uniform slice thickness (typically 16-20 mm for sandwich bread, 2-3 mm for thin sliced).
Slice thickness is electronically controlled and monitored—modern slicers maintain accuracy to within ±1 mm, ensuring every slice is consistent.
Sliced bread falls into collection chutes where it’s gathered for packaging, typically with 18-24 slices per loaf.
Toasting & Packaging
Step 12: Optional Commercial Toasting
Some bread marketed as “toast bread” or “sandwich bread” is lightly toasted before packaging—using conveyor toasters operating at 200-250°C for 30-60 seconds.
Light toasting removes surface moisture, improving crispiness and shelf-life while the interior remains soft.
However, most commercial toast bread is sold untoasted (as regular sandwich bread) and toasted by consumers at home.
Step 13: Bag Filling & Sealing
Sliced bread (toasted or fresh) is loaded into plastic bags at 16-24 slices per bag, depending on package size.
Bags are filled at high speed (30-50 loaves per minute) using automated bagging machines that count slices and fill to precise weight.
Bags are sealed using heat sealing or ultrasonic sealing, creating an airtight package that prevents mold growth and staleness.
Step 14: Nitrogen Flushing (Premium Products)
Some premium bread brands inject nitrogen gas into packages before sealing, displacing oxygen that causes bread to stale (oxidation) and develop mold.
Nitrogen flushing extends shelf-life from 5-7 days to 10-14 days, allowing longer distribution and retail display.
The nitrogen is food-grade and inert—it adds no flavor or safety concern.
Step 15: Labeling & Batch Coding
Filled bags are labeled with brand name, product type (whole wheat, multigrain, white, etc.), nutrition facts, ingredients list, and allergen warnings.
Batch codes and “best by” dates are printed on each label for traceability and quality assurance.
Vision inspection verifies label placement and legibility before packages proceed to case packing.
Step 16: Case Packing & Storage
Labeled bread bags are packed into cardboard cases (typically 10-12 bags per case) and stacked on pallets.
Bread is stored in climate-controlled warehouses at 15-20°C with 45-55% humidity—warm temperatures accelerate mold growth, cold temperatures make bread go stale faster.
Proper storage maintains freshness for 5-7 days unopened, or up to 3 weeks if frozen.
Step 17: Distribution & Retail Display
Packaged bread is distributed via ambient temperature trucks to retail stores, maintaining room temperature throughout logistics.
In stores, bread is displayed in dedicated bread sections at room temperature (refrigeration is unnecessary and actually promotes staling).
Consumers purchase and consume within the printed “best by” date, typically 5-7 days from production.
Why This Process?
Commercial fermentation is deliberately short (60-90 minutes) to enable multiple daily production batches, trading complex flavor development for production efficiency.
Enclosed rectangular pans create uniform loaves perfect for slicing—artisanal free-form baking would produce irregular shapes unsuitable for sliced sandwich bread.
Controlled humidity during baking creates soft crust (not crusty like artisanal bread)—consumers prefer thin, tender crust on sandwich bread.
Nitrogen flushing extends shelf-life by displacing oxygen—the primary cause of staleness and mold growth.
What About Additives & Preservatives?
Most commercial toast bread contains:
• Dough improvers (emulsifiers, oxidizing agents) – for better texture and shelf stability
• Preservatives (calcium propionate) – prevents mold growth
• Sugar – feeds yeast and improves browning
• Monoglycerides/diglycerides – emulsifiers for moisture retention
• Citric acid – flavor balancer
Premium or “artisanal” brands may contain only flour, water, yeast, and salt—with shorter shelf-life and higher price reflecting reduced additives.
The ingredient list reveals production approach—few ingredients suggest minimal processing; many ingredients suggest more additives and longer shelf-life targeting.
The Bottom Line
Toast bread production is an industrialized baking process optimized for consistency, shelf-life, and efficient slicing—creating millions of identical loaves daily through precise fermentation control, uniform pan baking, mechanical slicing, and protective packaging.
The process trades flavor complexity (from long fermentation) for production efficiency and shelf-life (from additives and preservatives).
Now you understand exactly how flour and water transform into uniform sliced toast bread through fermentation, commercial baking, mechanical slicing, and modern food preservation technology.